This tutorial will teach you to create a user registration and login system with procedural php and mysqli. The registration and login system is the most crucial part of the web application and the session plays a vital role to check the user’s login status. The source code is provided at the end of this tutorial.
Table of Content
- Setting up project folder
- Configure Database
- Database Connection
- Users File
- Init File
- Home Page
- Register Page
- Login Page
- Dashboard Page
- Logout
- Profile Data
- Setting
- Change Password
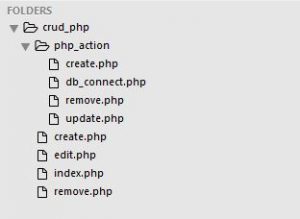
1. Setting up project folder
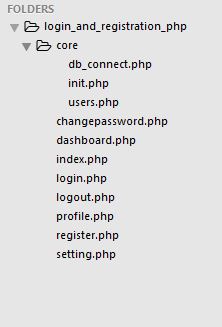
In this part, we will be setting up the project folder which contains eight files and one folder. First of all, create five files and name them changepassword.php, dashboard.php, index.php, login.php, logout.php, profile.php, register.php, and setting.php. Secondly, create a folder and name them as a core, and inside that folder create three files namely db_connect.php, init.php, and users.php.
If you have followed the steps correctly then the working folder files structure would look like the below:
2. Configure Database
Database Name: login_registration
Table Name: users
Table Column: id, username, password, first_name, last_name, contact, address, salt, active
Creating the database for this tutorial, you can either download the SQL Command at the end of this tutorial or copy and paste the following code into your MYSQL Database
CREATE DATABASE `login_registration`;

CREATE TABLE `login_registration`.`users` (
  `id` int(11) NOT NULL AUTO_INCREMENT,
  `username` varchar(255) NOT NULL,
  `password` varchar(255) NOT NULL,
  `first_name` varchar(255) NOT NULL,
  `last_name` varchar(255) NOT NULL,
  `contact` varchar(255) NOT NULL,
  `address` varchar(255) NOT NULL,
  `salt` text NOT NULL,
  `active` int(11) NOT NULL DEFAULT '0',
  PRIMARY KEY (`id`)
) ENGINE=InnoDB DEFAULT CHARSET=latin1 AUTO_INCREMENT=1 ;
3. Database Connection
In this part, we will be creating and checking the database connection. Go to db_connect.php i.e. [core/db_connect.php]. If you have a different database name for this tutorial then change the name of the database in this file which is highlighted below.
<?php

$servername = "127.0.0.1";
$username = "root";
$password = "";
$dbname = "login_registration";

// crearte connection
$connect = new Mysqli($servername, $username, $password, $dbname);

// check connection
if($connect->connect_error) {
	die("Connection Failed : " . $connect->error);
} else {
	// echo "Successfully Connected";
}

?>
4. Users File
This file contains the php function to manipulate the database operation. For instance, inserting the user’s credentials into the database, updating the user’s information, etc. This file is located at [core/users.php]. For now note that it file will be used to interact with the database, in a later chapter this file will use.
5. Init File
In this part, we will start the session and include the database connection file and user file. This file will be called on the login page, register page, change password page and etc.
<?php

session_start();

require_once 'db_connect.php';
require_once 'users.php';

?>
[/css]

6. Home Page
In this part, a simple login and register link is provided for the user to interact with the system. For now, copy and paste these codes into the index.php and we will go through them afterward.

[css autolinks="false" classname="myclass" collapse="false" firstline="1" gutter="true" highlight="" htmlscript="false" light="false" padlinenumbers="false" smarttabs="true" tabsize="4" toolbar="true" language="" title="index.php"]
<?php

require_once 'core/init.php';

if(logged_in() === TRUE) {
	header('location: dashboard.php');
}

?>

<!DOCTYPE html>
<html>
<head>
	<title>Login and Registration Procedural PHP </title>
</head>
<body>

<a href="login.php">Login</a> or <a href="register.php">Register</a>

</body>
</html>
[/css]

Firstly, the beginning of the code includes the init file which was explained before. The logged_in function is invoked from the users.php, this function checks the user's information stored in the session and redirects to the dashboard.php if its value is true.

Now go to users.php i.e. [core/users.php] to create a logged_in function. This function verifies if the id is stored in the session by returning the boolean value.

[css autolinks="false" classname="myclass" collapse="false" firstline="1" gutter="true" highlight="" htmlscript="false" light="false" padlinenumbers="false" smarttabs="true" tabsize="4" toolbar="true" language="" title="users.php"]
function logged_in() {
	if(isset($_SESSION['id'])) {
		return true;
	} else {
		return false;
	}
}
The index page should look like the below:

7. Register Users
In this part, we will create a registration form for users to enter their information. The submitted form will validate the required field information and call the registered users to function from the users.php and store it in the database. In this part, firstly we will create a user interface form and secondly, store the valid user’s information in the database by creating a function in the users.php.
Go to the register.php file to create a register form. For now, copy and paste these codes into the register.php file and go through them afterward.
<?php

require_once 'core/init.php';

if(logged_in() === TRUE) {
	header('location: dashboard.php');
}

// form is submitted
if($_POST) {

	$fname = $_POST['fname'];
	$lname = $_POST['lname'];
	$username = $_POST['username'];
	$password = $_POST['password'];
	$cpassword = $_POST['cpassword'];

	if($fname == "") {
		echo " * First Name is Required <br />";
	}

	if($lname == "") {
		echo " * Last Name is Required <br />";
	}

	if($username == "") {
		echo " * Username is Required <br />";
	}

	if($password == "") {
		echo " * Password is Required <br />";
	}

	if($cpassword == "") {
		echo " * Conform Password is Required <br />";
	}

	if($fname && $lname && $username && $password && $cpassword) {

		if($password == $cpassword) {
			if(userExists($username) === TRUE) {
				echo $_POST['username'] . " already exists !!";
			} else {
				if(registerUser() === TRUE) {
					echo "Successfully Registered <a href='login.php'>Login</a>";
				} else {
					echo "Error";
				}
			}
		} else {
			echo " * Password does not match with Conform Password <br />";
		}
	}

}

?>

<!DOCTYPE html>
<html>
<head>
	<title>Registration Form</title>
</head>
<body>


<form action="<?php echo $_SERVER['PHP_SELF']; ?>" method="POST">
	<div>
		<label for="fname">First Name: </label>
		<input type="text" name="fname" placeholder="First Name" autocomplete="off" value="<?php if($_POST) {
			echo $_POST['fname'];
			} ?>" />
	</div>
	<br />

	<div>
		<label for="lname">Last Name: </label>
		<input type="text" name="lname" placeholder="Last Name" autocomplete="off" value="<?php if($_POST) {
			echo $_POST['lname'];
			} ?>" />
	</div>
	<br />

	<div>
		<label for="username">Username: </label>
		<input type="text" name="username" placeholder="Username" autocomplete="off" value="<?php if($_POST) {
			echo $_POST['username'];
			} ?>" />
	</div>
	<br />

	<div>
		<label for="password">Password: </label>
		<input type="password" name="password" placeholder="Password" autocomplete="off" />
	</div>
	<br />

	<div>
		<label for="cpassword">Conform Password: </label>
		<input type="password" name="cpassword" placeholder="Conform Password" autocomplete="off" />
	</div>
	<br />
	<div>
		<button type="submit">Create</button>
		<button type="reset">Cancel</button>
	</div>

</form>

Already Registered? Click <a href="login.php">login</a>

</body>
</html>
In this file, the first line code includes the init.php file which was explained before. After that, the script checks if the user is already logged in by redirecting to the dashboard page. The script checks if the form is submitted and then stores the input value into their appropriate variable name respectively.
Secondly, it validates the value by providing an error message. Thirdly, if the form validation is valid then it checks the username by calling the userExists function and passing the username variable. If the username does not exist in the system then the script calls the registerUser function and displays a successful message. The userExists and registerUser function will be created in the users.php file. Now go to the users.php file, copy and paste these codes and we will go through them afterward.
function userExists($username) {
	// global keyword is used to access a global variable from within a function
	global $connect;

	$sql = "SELECT * FROM users WHERE username = '$username'";
	$query = $connect->query($sql);
	if($query->num_rows == 1) {
		return true;
	} else {
		return false;
	}

	$connect->close();
	// close the database connection
}

function registerUser() {

	global $connect;

	$fname = $_POST['fname'];
	$lname = $_POST['lname'];
	$username = $_POST['username'];
	$password = $_POST['password'];

	$salt = salt(32);
	$newPassword = makePassword($password, $salt);
	if($newPassword) {
		$sql = "INSERT INTO users (first_name, last_name, username, password, salt, active) VALUES ('$fname', '$lname', '$username', '$newPassword', '$salt' , 1)";
		$query = $connect->query($sql);
		if($query === TRUE) {
			return true;
		} else {
			return false;
		}
	} // /if

	$connect->close();
	// close the database connection
} // register user funtion

function salt($length) {
	return mcrypt_create_iv($length);
}

function makePassword($password, $salt) {
	return hash('sha256', $password.$salt);
}
The usersExists function requires one parameter i.e. username. The variable connect is a database connection used as a global. After that its checks the username by returning the boolean value.
The registerUser function does not require any parameter. This function calls the variable to connect as a global from the db_connetion file to execute the SQL query. This function also stores the form’s input value in the variable with the appropriate name. To secure the password, this function will encrypt the password value into a hash. To do this, we will first create a salt variable and call the salt function and pass thirty-two (32) lengths to generate the mcrypt_create_iv value. That salt will be stored in the database to match the password whenever users try to login into the system. After that, the makePassword function will have two parameters that are the password, and the salt variable returning the password value which is encrypted into the sha256 hash format.
Lastly, the scripts check the newPassword variable and insert the user’s information into the database by returning the boolean value.
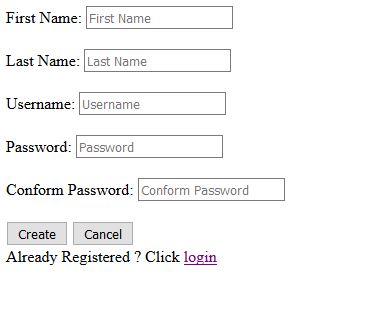
The register page should look like the below:
8. Login
In this part, we will create a login form for users to enter their login credentials. The login form submitted will validate the required field and check if the username exists if it exists then it calls the login function and stores the user’s information in the session. Firstly, we will create a user interface form, and secondly, validate the required field and login into the system, and store it in the session.
Go to the login.php file to create a login form. For now, copy and paste these codes into the login.php file and we will go through them afterward.
<?php

require_once 'core/init.php';

if(logged_in() === TRUE) {
	header('location: dashboard.php');
}

// form submiited
if($_POST) {
	$username = $_POST['username'];
	$password = $_POST['password'];

	if($username == "") {
		echo " * Username Field is Required <br />";
	}

	if($password == "") {
		echo " * Password Field is Required <br />";
	}

	if($username && $password) {
		if(userExists($username) == TRUE) {
			$login = login($username, $password);
			if($login) {
				$userdata = userdata($username);

				$_SESSION['id'] = $userdata['id'];

				header('location: dashboard.php');
				exit();

			} else {
				echo "Incorrect username/password combination";
			}
		} else{
			echo "username does not exists";
		}
	}

} // /if


?>


<!DOCTYPE html>
<html>
<head>
	<title>Login</title>
</head>
<body>

<form action="<?php echo $_SERVER['PHP_SELF'] ?>" method="POST">
	<div>
		<label for="username">Username</label>
		<input type="text" name="username" id="username" autocomplete="off" placeholder="Username" />
	</div>
	<br />

	<div>
		<label for="password">Password</label>
		<input type="password" name="password" id="password" autocomplete="off" placeholder="Password" />
	</div>
	<br />

	<div>
		<button type="submit">Login</button>
		<button type="reset">Cancel</button>
	</div>

</form>

Not Registered? Click <a href="register.php">Register</a>

</body>
</html>
This file includes the init.php and checks if the user is logged in. After that, the script checks if the form is submitted, and if it’s true then it stores the username and password value in the respective variable name. The scripts validate the username and password value and display an appropriate message. If the validation is valid then the scripts checks if the username value exists in the database by displaying an error message. If the username value exists in the database then it calls the login function with two parameters which are username, and password variables. If the login function returns the true value then the script retrieves the user’s information by calling the user data function by passing the username variable and storing the user’s id into the session and redirecting to the dashboard.
The logged_in, userExists function is already created in the registered chapter. In this part, the login, and userdata function is new. For now, go to the users.php file, copy and paste these codes and we will go through them afterward.
function login($username, $password) {
	global $connect;
	$userdata = userdata($username);

	if($userdata) {
		$makePassword = makePassword($password, $userdata['salt']);
		$sql = "SELECT * FROM users WHERE username = '$username' AND password = '$makePassword'";
		$query = $connect->query($sql);

		if($query->num_rows == 1) {
			return true;
		} else {
			return false;
		}
	}

	$connect->close();
	// close the database connection
}

function userdata($username) {
	global $connect;
	$sql = "SELECT * FROM users WHERE username = '$username'";
	$query = $connect->query($sql);
	$result = $query->fetch_assoc();
	if($query->num_rows == 1) {
		return $result;
	} else {
		return false;
	}

	$connect->close();

	// close the database connection
}
The login function requires two parameters i.e. username and password. The variable connect is a global variable that holds the database connection and will be used to execute the SQL query. The userdata variable holds the user’s information. The script checks if the userdata variable is not empty. If the userdata variable is valid the script creates a new variable as a makePassword which holds the encrypted was of the by calling the makePassword (this function is defined in the previous part). After that the script checks if the provided information matches with the database and returns the boolean value.
The userdata function required one parameter i.e. username. The scripts fetch the user’s information through the username value and return the user’s information.
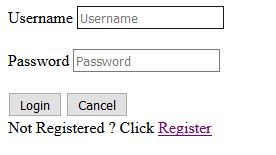
The login page should look like the below :
9. Dashboard
The valid users will be redirected to this page. The dashboard contains the following pages and they are Profile, setting, change password, and Logout. This list will be listed in the unordered list with a link that will redirect to the selected page. For now, copy and paste these codes into the dashboard.php file and we will go through them afterward.
<?php

require_once 'core/init.php';

if(not_logged_in() === TRUE) {
	header('location: login.php');
}

$userdata = getUserDataByUserId($_SESSION['id']);

?>

<!DOCTYPE html>
<html>
<head>
	<title>Dashboard</title>
</head>
<body>

<ul>
	<li>Hello , <?php echo $userdata['username']; ?></li>
	<li><a href="profile.php">Profile</a></li>
	<li><a href="setting.php">Setting</a></li>
	<li><a href="changepassword.php">Change Password</a></li>
	<li><a href="logout.php">Logout</a></li>
</ul>

</body>
</html>
This page will include the init file which was discussed in the early part. This page will also check if the user is not logged in to the system and then redirect to the login page. The user data variable holds the user’s information through the user id which was stored while logging the user id was stored into the session.
The not_logged_in function will return the session login status by returning the boolean value. The getUserDataByUserId function requires one parameter which is the user id. This function is invoked by the users.php, its retrieves the user information via the user id which was stored in the session.
For not_logged_in, and getUserDataByUserId functions, go to users.php, copy and paste these codes into the users.php file and we will go through them afterward.
<?php

function not_logged_in() {
	if(isset($_SESSION['id']) === FALSE) {
		return true;
	} else {
		return false;
	}
}

function getUserDataByUserId($id) {
	global $connect;

	$sql = "SELECT * FROM users WHERE id = $id";
	$query = $connect->query($sql);
	$result = $query->fetch_assoc();
	return $result;

	$connect->close();
}

?>
The not_logged_in function checks the id stored in the session by returning the boolean value. If the user id is stored in the session then returns true else false.
The getUserDataByUserId function requires one parameter which is id. This function selects the user’s information from the user’s table where the id is equal to provided id and it returns in an associative array.
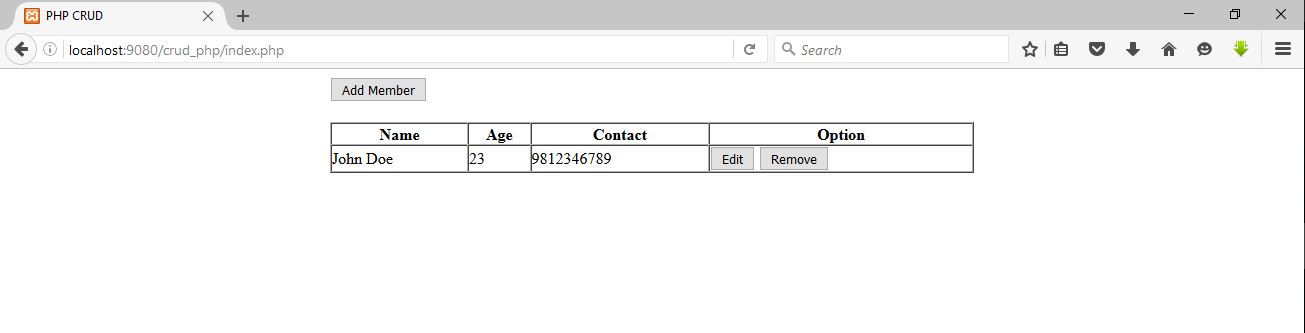
The dashboard page should look like below :

10. Logout
In this part, the logout page will call the logout function from the users.php file. The logout function will unset and destroy the session and redirects to the login page. For now, copy and paste these codes into the logout.php and we will go through afterward.
<?php

require_once 'core/init.php';

logout();

?>
When evet the user clicks on the logout links the page will redirect to this page. This page contains the init file and logout function invoked from the user.php file. The main function of logout contains the logout function in the users.php file which is listed below. For now, copy and paste these codes into the users.php file and we will go through them afterward.
<?php

function logout() {
	if(logged_in() === TRUE){
		// remove all session variable
		session_unset();

		// destroy the session
		session_destroy();

		header('location: login.php');
	}
}

?>
This function logout will call the logged_in function to check if the user is logged in to the system. If the statement is true then the scripts will call the built-in php function session_unset and session_destoy to remove and destroy the session variable and it redirects to the login page.
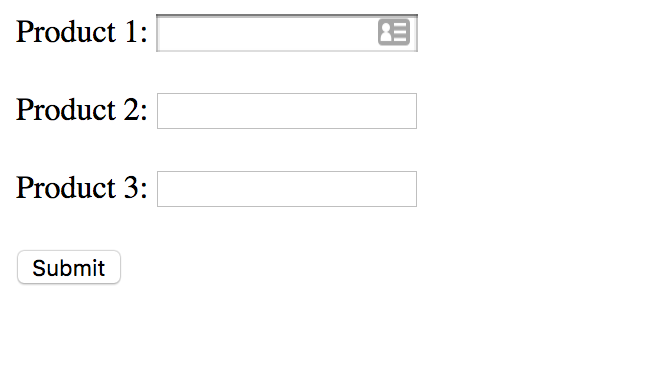
11. Profile Data
In this part, we will be fetching the user’s information from the database through the user id which is stored in the session. For now, copy and paste these codes into profile.php and we will go through them afterward.
<?php

require_once 'core/init.php';

if(not_logged_in() === TRUE) {
	header('location: login.php');
}

$userdata = getUserDataByUserId($_SESSION['id']);

?>

<!DOCTYPE html>
<html>
<head>
	<title>Profile Information</title>
</head>
<body>

<h1>Profile Information</h1>

<table border="1" style="width:100%;">
	<tr>
		<th>Username </th>
		<td><?php echo $userdata['username'] ?></td>
	</tr>
	<tr>
		<th>First Name </th>
		<td><?php echo $userdata['first_name'] ?></td>
	</tr>
	<tr>
		<th>Last Name </th>
		<td><?php echo $userdata['last_name'] ?></td>
	</tr>
	<tr>
		<th>Contact </th>
		<td><?php echo $userdata['contact'] ?></td>
	</tr>
	<tr>
		<th>Address </th>
		<td><?php echo $userdata['address'] ?></td>
	</tr>
</table>

<br />

<a href="dashboard.php"><button type="button">Back</button></a>

</body>
</html>
This page includes the init.php file and checks if the user is not logged in to the system which calls the not_logged_in function to check the user’s status. The user’s information is retrieved by calling the getUserDataByUserId function which requires one parameter and stores the retrieve data in the user data variable.
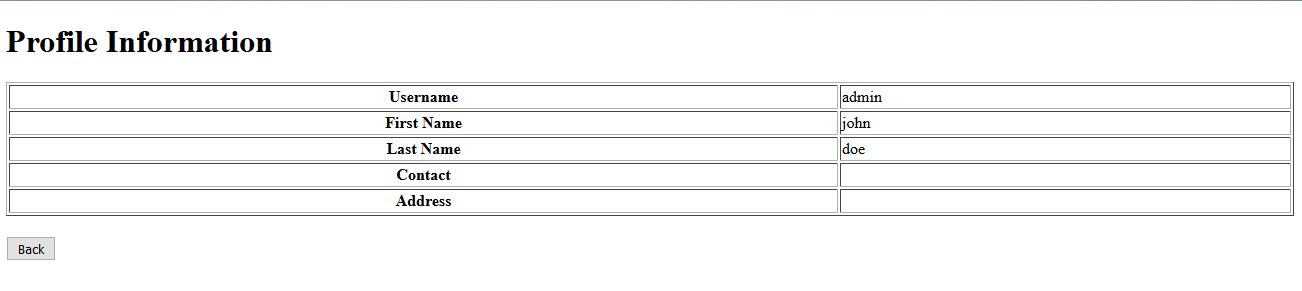
The user’s information is displayed in the table layout as you can see below image. The not_logged_in and getUserDataByUserId functions explain before the part.
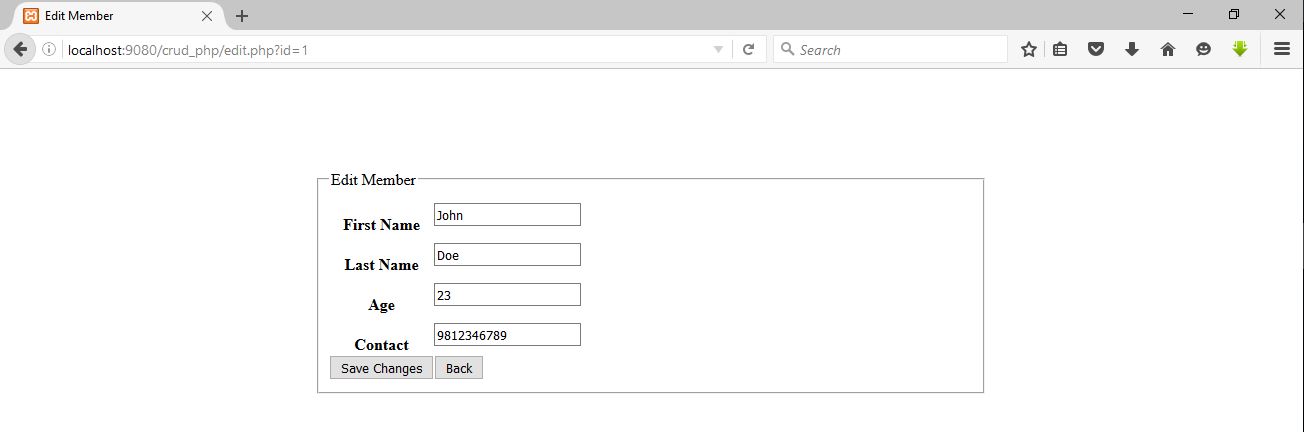
The profile page should look like below :
12. Setting
In this part, the valid user should be to update their information. This page will display the user’s information which is stored in the system. For now, copy and paste these codes into the setting.php file and we will go through them afterward.
<?php require_once 'core/init.php';

if(not_logged_in() === TRUE) {
	header('location: login.php');
}

$userdata = getUserDataByUserId($_SESSION['id']);


if($_POST) {
	$fname = $_POST['fname'];
	$lname = $_POST['lname'];
	$username = $_POST['username'];
	$contact = $_POST['contact'];
	$address = $_POST['address'];

	if($fname == "") {
		echo " * First Name is Required <br />";
	}

	if($lname == "") {
		echo " * Last Name is Required <br />";
	}

	if($username == "") {
		echo " * Username is Required <br />";
	}

	if($contact == "") {
		echo " * Contact is Required <br />";
	}

	if($address == "") {
		echo " * Address is Required <br />";
	}

	if($fname && $lname && $username && $contact && $address) {
		$user_exists = users_exists_by_id($_SESSION['id'], $username);
		if($user_exists === TRUE) {
			echo "username already exists <br /> ";
		} else {
			if(updateInfo($_SESSION['id']) === TRUE) {
				echo "Successfully Updated <br />";
			} else {
				echo "Error while updating the information";
			}
		}
	}

}


?>


<!DOCTYPE html>
<html>
<head>
	<title>Setting</title>
</head>
<body>

<form action="<?php $_SERVER['PHP_SELF'] ?>" method="POST">
	<div>
		<label for="username">Username</label>
		<input type="text" name="username" id="username" placeholder="Username" value="<?php if($_POST) {
			echo $_POST['username'];
			} else {
			 	echo $userdata['username'];
			 	} ?>">
	</div>
	<br />

	<div>
		<label for="fname">First Name</label>
		<input type="text" name="fname" id="fname" placeholder="Fisrt Name" value="<?php if($_POST) {
			echo $_POST['fname'];
			} else {
				echo $userdata['first_name'];
				} ?>">
	</div>
	<br />

	<div>
		<label for="lname">Last Name</label>
		<input type="text" name="lname" id="lname" placeholder="Last Name" value="<?php if($_POST) {
			echo $_POST['lname'];
			} else {
				echo $userdata['last_name'];
				} ?>">
	</div>
	<br />

	<div>
		<label for="contact">Contact</label>
		<input type="text" name="contact" id="contact" placeholder="Contact" value="<?php if($_POST) {
			echo $_POST['contact'];
			} else {
				echo $userdata['contact'];
				} ?>">
	</div>
	<br />

	<div>
		<label for="address">Address</label>
		<input type="text" name="address" id="address" placeholder="Address" value="<?php if($_POST) {
			echo $_POST['address'];
			} else {
				echo $userdata['address'];
				} ?>">
	</div>
	<br />

	<div>
		<button type="submit">Submit</button>
	</div>

</form>

<a href="dashboard.php"><button type="button">Back</button></a>

</body>
</html>
This page includes the init file and checks the user’s logged-in status. The user’s information is retrieved by calling a getUserDataByUserId function which requires one parameter i.e. user id. The script checks if the form is submitted and stores the input value into the variable with its appropriate name. After that, the scripts validate the input field and if it is valid then it checks if the user’s name already exists in the system by calling the users_exists_by_id function which required two parameters i.e. user id and username value. If the username does not exist in the system then the script calls the updateInfo function which required one parameter which is the user id and updates the information in the system by displaying a successful message.
The not_logged_in, getUserDataByUserId function has been explained before the chapter. The new function in this part is users_exists_by_id and updateInfor function is the new functionality in this part. For now, copy and paste these codes into the users.php file and we will go through them afterward.
<?php

function users_exists_by_id($id, $username) {
	global $connect;

	$sql = "SELECT * FROM users WHERE username = '$username' AND id != $id";
	$query = $connect->query($sql);
	if($query->num_rows >= 1) {
		return true;
	} else {
		return false;
	}

	$connect->close();
}

function updateInfo($id) {
	global $connect;

	$username = $_POST['username'];
	$fname = $_POST['fname'];
	$lname = $_POST['lname'];
	$contact = $_POST['contact'];
	$address = $_POST['address'];

	$sql = "UPDATE users SET username = '$username', first_name = '$fname', last_name = '$lname', contact = '$contact', address = '$address' WHERE id = $id";
	$query = $connect->query($sql);
	if($query === TRUE) {
		return true;
	} else {
		return false;
	}
}
The users_exists_by_id function requires two parameters that are the user id, and username value. This function calls the global connect variable to execute the SQL queries. Then it selects the user’s information from the user’s table which id is not equal to the current logged-in user id because the username should not be equal to the current logged-in username. After the query execution, the script checks if the username exists more than or equal to one by returning the boolean value.
The updateInfo function requires one parameter which is the user id. This function stores the form input value into the variable with the appropriate name and executes the query.
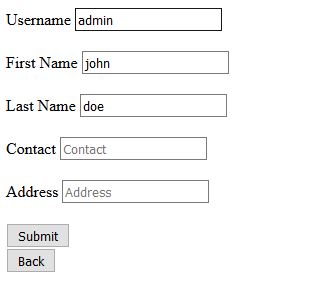
The setting page should look like the below:
13. Change password
In this part, the logged-in users should be able to change the current password into a new password. The change password page should display a form that contains the current password, new password, and password again input field. For now, copy and paste these codes into the changepassword.php file and we will go through them afterward.
<?php

require_once 'core/init.php';

if(not_logged_in() === TRUE) {
	header('location: login.php');
}

if($_POST) {
	$currentpassword = $_POST['currentpassword'];
	$newpassword = $_POST['password'];
	$conformpassword = $_POST['conformpassword'];

	if($currentpassword == "") {
		echo "Current Password field is required <br />";
	}

	if($newpassword == "") {
		echo "New Password field is required <br />";
	}

	if($conformpassword == "") {
		echo "Conform Password field is required <br />";
	}

	if($currentpassword && $newpassword && $conformpassword) {
		if(passwordMatch($_SESSION['id'], $currentpassword) === TRUE) {

			if($newpassword != $conformpassword) {
				echo "New password does not match conform password <br />";
			} else {
				if(changePassword($_SESSION['id'], $newpassword) === TRUE) {
					echo "Successfully updated";
				} else {
					echo "Error while updating the information <br />";
				}
			}

		} else {
			echo "Current Password is incorrect <br />";
		}
	}
}

?>

<!DOCTYPE html>
<html>
<head>
	<title>Change Password</title>
</head>
<body>

<form action="<?php echo $_SERVER['PHP_SELF'] ?>" method="POST">
	<table>
		<tr>
			<th>
				Current Password
			</th>
			<td>
				<input type="password" name="currentpassword" autocomplete="off" placeholder="Current Password" />
			</td>
		</tr>
		<tr>
			<th>
				New Password
			</th>
			<td>
				<input type="password" name="password" autocomplete="off" placeholder="New Password" />
			</td>
		</tr>
		<tr>
			<th>
				Conform Password
			</th>
			<td>
				<input type="password" name="conformpassword" autocomplete="off" placeholder="Confrom Password" />
			</td>
		</tr>
		<tr>
			<td>
				<button type="submit">Change Password</button>
			</td>
			<td>
				<a href="dashboard.php"><button type="button">Back</button></a>
			</td>
		</tr>
	</table>
</form>

</body>
</html>
This page requires the init.php file and checks the user’s logged-in status. The script checks if the form is submitted and stores the value in the variable with an appropriate name. The scripts validate the required field and if it is valid then firstly, the script checks if the current password matches with users in the database. This is done by calling the passwordMatch function which requires two parameters, the user id which is stored in the session, and the current password variable which holds the value of the current. If the current password matches with the current logged-in user details then the changePassword function will store the new password in the user’s table.
The passwordMatch and changePassword functions will be explained. For now, copy and paste these codes into the users.php file and we will go through them afterward.
<?php

function passwordMatch($id, $password) {
	global $connect;

	$userdata = getUserDataByUserId($id);

	$makePassword = makePassword($password, $userdata['salt']);

	if($makePassword == $userdata['password']) {
		return true;
	} else {
		return false;
	}

	// close connection
	$connect->close();
}

function changePassword($id, $password) {
	global $connect;

	$salt = salt(32);
	$makePassword = makePassword($password, $salt);

	$sql = "UPDATE users SET password = '$makePassword', salt = '$salt' WHERE id = $id";
	$query = $connect->query($sql);

	if($query === TRUE) {
		return true;
	} else {
		return false;
	}

?>
The passwordMatch function requires two parameters which are user id and password value. This function fetches the user’s details from the database by the getUserDataByUserId function and makes an encrypted password by calling the makePassword function by passing the password variable, and the salt value from $userdata variable should be retrieved before. Now the script checks the encrypted password value equal to the user information retrieved from the database.
The changPassword function requires two parameters which are the user id and password variable. This function creates a new salt value by calling the salt function and passing the thirty-two length parameters. Then it makes an encrypted password by calling the makePassword function and updates the password information in the system.
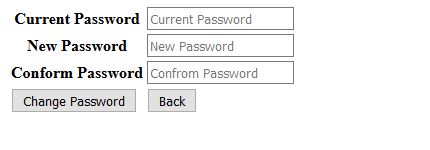
The change password page should look like the below:
Source Code
Download Source Code
Download