
The parking Management System is the most complete and versatile parking management system. This system is an open-source project. We have provided the most advanced backend management functionality with parking slots, parking rates, parking categories, and more of the best functionality.
Parking Management System is an open-source project for people who wants to grab the core idea of the data process within the system. This system is built on CodeIgniter – PHP framework, adminlte, bootstrap, javascript, jQuery, and Ajax. This system, Parking Management System, is based on the Web Application. It provides advanced functionality and runs daily basic requirements for the parking system. Many users can manage work with the system based on their user permission.
The admin can create as many users as he wants based on the user’s permission. The permission is set up in the group section. The super admin can create the group with limited functionality. Please have a look at the video which will make
the concept more clear to you.
In this application, there are a lot of dependencies that you will have to understand. For instance, to create the parking information, you must have the parking category, rates, and slot information on the system. Without them the parking information is incomplete.
Please follow each and every step to run this system on your system. You will need to make a few changes to the code to run this application our your design. I hope you have installed XAMPP (windows), and MAMP (MACOS) on your system.
The source code and the database are provided at the end of the tutorial. Please download them and follow each and every step to successfully install and run the system.
Users
- Admin
- Email: admin@admin.com
- password: password
Features
-
Manage User
- Add new user detail
- View, Update, and remove user information
-
Manage Groups
- Add new group information
- View, Update, and remove group information
-
Manage Category
- Add category information
- View, Update, and remove category information
-
Manage Rates
- Add rate information
- View, Update, and remove rate information
-
Manage Slot
- Add slot information
- View, Update, and remove slot information
-
Manage Parking
- Add parking information
- View, Update, and remove parking information
- Update the slot availability
-
Reports
- View the paid parking information based on the yearly
-
Manage Company information
- Update the company information
-
View Profile information
- View user profile information
-
Manage Setting
- Update user information
- Update password information
Requirements
- PHP Version +7.0.0
- Web Server ( Recommended: Apache with PHP and Mysqli )
Installing source code and database guidelines
Step 1: Download the database and source.
Step 2: Change port no.
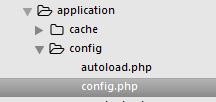
Go to the application > config > config.php as shown below.
After that go to base_url, and update or remove the port no based on your system configuration:
[css autolinks=”false” classname=”myclass” collapse=”false” firstline=”1″ gutter=”true” highlight=”” htmlscript=”false” light=”false” padlinenumbers=”false” smarttabs=”true” tabsize=”4″ toolbar=”true” title=””]
$config[‘base_url’] = ‘http://localhost:8888/parking’;
[/css]
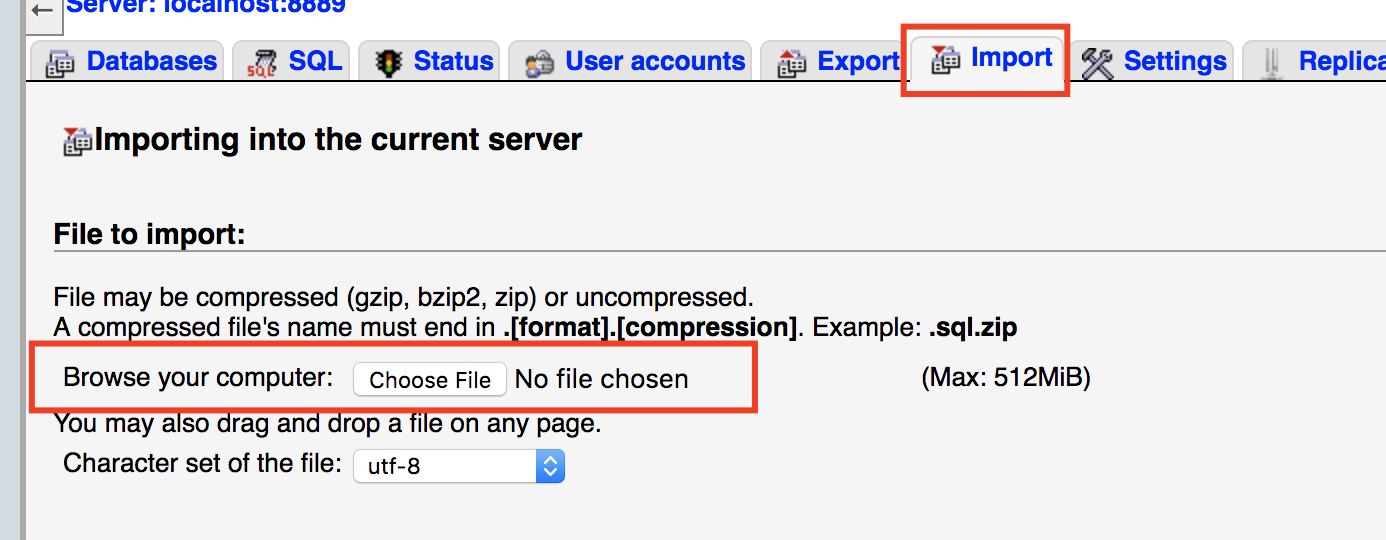
Step 3: Create the database and import the SQL
Go to http://localhost:8888/phpmyadmin, and click on the database section. There create the database name as “parking”.
After that click on the created database and import the database file which has been provided.
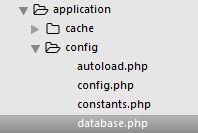
Now, Go to the application > config > Database.php file.
In this file there are 3 things to update. They are username, password, and database.
username: Change username based on database user’s username
password: Change password based on database user’s password
database: Change database name if you different database name
$db['default'] = array(
   'dsn'	=> '',
   'hostname' => 'localhost',
   'username' => 'root',
   'password' => 'root',
   'database' => 'parking',
   'dbdriver' => 'mysqli',
   'dbprefix' => '',
   'pconnect' => FALSE,
   'db_debug' => (ENVIRONMENT !== 'production'),
   'cache_on' => FALSE,
   'cachedir' => '',
   'char_set' => 'utf8',
   'dbcollat' => 'utf8_general_ci',
   'swap_pre' => '',
   'encrypt' => FALSE,
   'compress' => FALSE,
   'stricton' => FALSE,
   'failover' => array(),
   'save_queries' => TRUE
);
If this project really helped you guys, then please comment, and share. Thank you.
CHANGELOG
1.1>
* Fixed the session issue
* Fixed the empty string core/Output.php
* Fixed the setCookie() deprecated issue.