
How to upload image with ajax and php
AJAX (Asynchronous JavaScript and XML) is a popular technique to update part of a web page without reloading the whole page. The Ajax method will enhance the web application better, faster, and more interactive.
To upload the image into the database, we will be working with procedural PHP, and using the Ajax functionality to send the request to the server.
At the end of this tutorial, we have provided a source code and database link below section.
Table of Content
- Setting up assets file and project folder
- Configure the Database
- Creating a form
- Creating the PHP file to process
- Submitting the form using Ajax
- Display all uploaded data
1. Setting up assets file and project folder
The asset file that we will be working with in this tutorial is jquery, bootstrap, and fileinput. To download these files click on the asset name which will redirect to their official website.
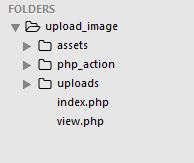
Firstly, create the project folder named as upload_image or something else you desire. Secondly, after creating the project folder, go inside that project folder and create three folders (assets, php_action, uploads) i.e. [upload_image/assets], [upload_image/php_action] and [upload_image/uploads], and two php files namely i.e. [upload_image/index.php] and [upload_image/view.php].
In the assets folder, create the three folders namely bootstrap, jquery, and file input, and paste those downloaded plugins respectively. In the php_action folder create a php file and name the file an uploadImage.php which will be processing the image information into the database. The uploads folder contains the uploaded images.
If you have followed the instruction correctly then the project folder and file structure could look like the below:
2. Configure the Database
Database Name: upload_image
Table Name: users
Table Column: id, name, image
Copy and paste the following SQL command into your MySQL database to create a database and table.
CREATE DATABASE `upload_image`;

CREATE TABLE `upload_image`.`users` (
  `id` int(11) NOT NULL AUTO_INCREMENT,
  `name` varchar(255) NOT NULL,
  `image` text NOT NULL,
  PRIMARY KEY (`id`)
) ENGINE=InnoDB DEFAULT CHARSET=latin1 AUTO_INCREMENT=1 ;
3. Creating a form
We will be using the Bootstrap framework to create a simple form for better UI. For now, go to the index.php file and paste these codes and we will go through them afterward.
<!DOCTYPE html>
<html>
<head>
	<title></title>
	<!-- boostrap css-->
	<link rel="stylesheet" type="text/css" href="assets/bootstrap/css/bootstrap.min.css">

	<!-- file input css -->
	<link rel="stylesheet" type="text/css" href="assets/fileinput/css/fileinput.min.css">
</head>
<body>

	<div class="col-md-5 col-sm-5 col-md-offset-4 col-sm-offset-4">
		<div class="page-header">
			<h3>Upload Image with Ajax</h3>

			<a href="view.php" class="btn btn-default">View User</a>
		</div>

		<div id="messages"></div>

		<form action="php_action/uploadImage.php" method="post" enctype="multipart/form-data" id="uploadImageForm">
		  <div class="form-group">
		    <label for="fullName">Name</label>
		    <input type="text" class="form-control" id="fullName" name="fullName" placeholder="Name">
		  </div>
		  <div class="form-group">
		    <label for="exampleInputPassword1">Photo</label>
		    <div id="kv-avatar-errors-2" class="center-block" style="width:800px;display:none"></div>

            <div class="kv-avatar center-block" style="width:200px">
		        <input id="avatar-2" name="userImage" type="file" class="file-loading">
		    </div>
		  </div>
		  <button type="submit" class="btn btn-default">Submit</button>
		</form>

	</div>

	<!-- jquery -->
	<script type="text/javascript" src="assets/jquery/jquery.min.js"></script>
	<!-- bootsrap js -->
	<script type="text/javascript" src="assets/bootstrap/js/bootstrap.min.js"></script>
	<!-- file input -->
	<script src="assets/fileinput/js/plugins/canvas-to-blob.min.js" type="text/javascript"></script>
	<script src="assets/fileinput/js/plugins/sortable.min.js" type="text/javascript"></script>
	<script src="assets/fileinput/js/plugins/purify.min.js" type="text/javascript"></script>
	<script src="assets/fileinput/js/fileinput.min.js"></script>

	<script type="text/javascript">
		var btnCust = '<button type="button" class="btn btn-default" title="Add picture tags" ' +
		    'onclick="alert(\'Call your custom code here.\')">' +
	    	'<i class="glyphicon glyphicon-tag"></i>' +
		    '</button>';

		$("#avatar-2").fileinput({
	    overwriteInitial: true,
	    maxFileSize: 1500,
	    showClose: false,
	    showCaption: false,
	    showBrowse: false,
	    browseOnZoneClick: true,
	    removeLabel: '',
	    removeIcon: '<i class="glyphicon glyphicon-remove"></i>',
	    removeTitle: 'Cancel or reset changes',
	    elErrorContainer: '#kv-avatar-errors-2',
	    msgErrorClass: 'alert alert-block alert-danger',
	    defaultPreviewContent: '<img src="uploads/default-avatar.jpg" alt="Your Avatar" style="width:160px"><h6 class="text-muted">Click to select</h6>',
	    layoutTemplates: {main2: '{preview} ' +  btnCust + ' {remove} {browse}'},
	    allowedFileExtensions: ["jpg", "png", "gif"]
		});
	</script>
</body>
</html>
In this file, we will be including the downloaded plugins and create the form to upload the images. In the above code at the head section, we will be including the bootstrap and fileinput css file. At the bottom of the body section, we will be including the jquery, bootstrap, and fileinput js files.
4. Creating the PHP file to Process
In this section, we will be creating a simple PHP script to store the uploaded image file in the server directory by giving a unique name and storing that name in the database. For now, copy and paste these codes into the uploadImage.php file which is located in the php_action folder i.e. [upload_image/php_ation/uploadImage.php].
<?php

if($_POST) {
	// database connection
	$server = '127.0.0.1';
	$username = 'root';
	$password = '';
	$dbname = 'upload_image';

	$conn = new mysqli($server, $username, $password, $dbname);

	// check db connection
	if($conn->connect_error) {
		die("Connection Failed : " . $conn->connect_error);
	}
	else {
		// echo "Successfully Connected";
	}

	$valid = array('success' => false, 'messages' => array());

	$name = $_POST['fullName'];

	$type = explode('.', $_FILES['userImage']['name']);
	$type = $type[count($type) - 1];
	$url = '../uploads/' . uniqid(rand()) . '.' . $type;

	if(in_array($type, array('gif', 'jpg', 'jpeg', 'png'))) {
		if(is_uploaded_file($_FILES['userImage']['tmp_name'])) {
			if(move_uploaded_file($_FILES['userImage']['tmp_name'], $url)) {

				// insert into database
				$sql = "INSERT INTO users (name, image) VALUES ('$name', '$url')";

				if($conn->query($sql) === TRUE) {
					$valid['success'] = true;
					$valid['messages'] = "Successfully Uploaded";
				}
				else {
					$valid['success'] = false;
					$valid['messages'] = "Error while uploading";
				}

				$conn->close();

			}
			else {
				$valid['success'] = false;
				$valid['messages'] = "Error while uploading";
			}
		}
	}

	echo json_encode($valid);

	// upload the file
}
In the above codes, the first script checks if the form is submitted. After that, the database connection is created and stored in the conn variable for further processing. Secondly, the uploaded image type is checked and creates a unique id for the image name and moves to the uploads folder, and stores the information in the database.
5. Submitting the form using Ajax
To upload the form using Ajax, we will need to do several things in the index.php file. Copy and paste these codes into the index.php file at the end of the script where avatar-2 is initiated.
<script>
$(document).ready(function() {
$("#uploadImageForm").unbind('submit').bind('submit', function() {
var form = $(this);
var formData = new FormData($(this)[0]);
$.ajax({
url: form.attr('action'),
type: form.attr('method'),
data: formData,
dataType: 'json',
cache: false,
contentType: false,
processData: false,
async: false,
success:function(response) {
if(response.success == true) {
$("#messages").html('<div class="alert alert-success alert-dismissible" role="alert">'+
'<button type="button" class="close" data-dismiss="alert" aria-label="Close"><span aria-hidden="true">×</span></button>'+
response.messages +
'</div>');
$('input[type="text"]').val('');
$(".fileinput-remove-button").click();
}
else {
$("#messages").html('<div class="alert alert-warning alert-dismissible" role="alert">'+
'<button type="button" class="close" data-dismiss="alert" aria-label="Close"><span aria-hidden="true">×</span></button>'+
response.messages +
'</div>');
}
}
});
return false;
});
});
</script>
In the above codes, the form on submit event is caught by #uploadImageForm id which was created in Chapter 3. The form variable holds the action, and method values of the form element, whereas the formData variable holds the data of the form. After that, the jquery built-in Ajax function will be used to process the data to the server and respond with the message state.
6. Display all uploaded data
In this section, we will be displaying the users’ information that is stored in the database. Copy and paste these codes into the view.php file which is located at [upload_image/view.php].
<!DOCTYPE html>
<html>
<head>
	<title></title>

	<!-- boostrap css-->
	<link rel="stylesheet" type="text/css" href="assets/bootstrap/css/bootstrap.min.css">
</head>
<body>

<br /> <br /> <br />
<div class="col-md-5 col-sm-5 col-md-offset-4 col-sm-offset-4">
	<a href="index.php" class="btn btn-default">Back</a>
	<table class="table table-bordered">
		<tr>
			<th>S.no</th>
			<th>Name</th>
			<th>Photo</th>
		</tr>

		<?php
		// database connection
		$server = '127.0.0.1';
		$username = 'root';
		$password = '';
		$dbname = 'upload_image';

		$conn = new mysqli($server, $username, $password, $dbname);

		// check db connection
		if($conn->connect_error) {
			die("Connection Failed : " . $conn->connect_error);
		}
		else {
			// echo "Successfully Connected";
		}

		$sql = "SELECT * FROM users";
		$query = $conn->query($sql);

		$x = 1;
		while ($result = $query->fetch_assoc()) {
			$image = substr($result['image'], 3);

			echo "<tr>
				<td>".$x."</td>
				<td>".$result['name']."</td>
				<td> <img src='".$image."' style='height:100px; width:100px;' /> </td>
			</tr>";
			$x++;
		}

		?>
	</table>
</div>

</body>
</html>

Yes! Finally someone writes about Sabun Pemutih Kulit.
Great beat ! I would like to apprentice while you amend your website, how can i subscribe for a blog site?
The account aided me a acceptable deal. I had been tiny bit acquainted of this your broadcast provided
bright clear concept